A lash lift, or lash perming, can have some dramatic results, including making your eyes look bigger, your lashes look longer and fuller, and just overall make you look like you have lashes if they're dead straight. Eyebrow lamination, performed with the same products, can also save you grooming your brows by having them sit the way that you'd like without the use of brow gels.
These have become very popular beauty services that are available in salon, but can you achieve the same results with a kit available to anybody? Let's find out!
.
Before we get into things, I'd like to state that I am formally trained as a beauty therapist and although I only got 3/4 of the way into my diploma when the college shut down, I did complete and pass my lash and brow services module early on in the course. This means I am qualified to administer lash and brow tints in salon. I am not sure whether the newer training package for lash and brow services includes the application of perm solutions as I was not trained in this particular treatment, but I feel competent in my skills to execute this kind of treatment based on my training.
.
Curled Lashes
I found Curled Lashes on Instagram while doing my regular scroll through. They are based in Melbourne and offer their lash lift and brow lamination kit for $79.95AUD, which provides enough product for 8 treatments. I purchased it during their Black Friday sale and got it for about 30% off.
The Curled Lashes brand are vegan & cruelty free and safe to use in the eye area with results can last up to 8 weeks.
.
In The Box
You get everything you need to do a lash lift at home.
Perming Lotion - This is the curling agent and it smells like a bag of farts, but is an essential to the chemical process of restructuring the bonds in hair to make it take shape.
Fixation Lotion - This is used after the perming lotion to make sure the curl/lamination has set in place.
Nutrition Lotion - A conditioning serum to apply post treatment to nourish lashes.
Cleansing Lotion - A water based cleanser to use before and after treatment.
Lash Adhesive - This is specifically formulated to stick to silicone so the lift pads sticks to your skin and your lashes stick to the lift pad.
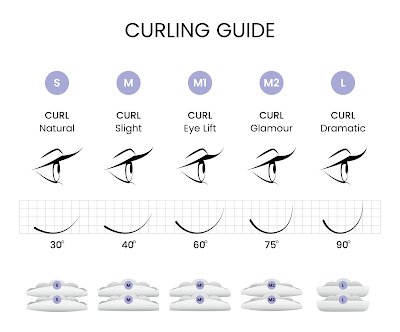
Lift Pads - These silicone pads are used to set the curl angle in 5 sizes with varying curl degrees as shown in the guide below.
Cleaning Tool - A Y shaped plastic tool that is flat on one side and has a comb on the other. The flat side is used to roll the lashes onto the lift pad, and the comb is used to clean off excess product.
.
How To Use
I want to say that going through this process was easy, but between trying to follow the instructions and recording everything I was doing (photos), I ran into a few problems.
(You can view the full instructions here to follow along.)
Before I even began, I set up an area with lots of paper towels, cotton pads, cotton tips, plastic wrap at the ready, decent lighting, a bowl of water in case I need to flush my eyes, and some Isocol to sanitise things during clean up.
I was unsure which size pad to use, there are five; Small, Medium, Medium 1, Medium 2, and Large. I first settled on Medium 2, then Medium 1, and eventually settled on Medium.
 |
| Image description: Each size of the lift pads, white oval silicone shapes that almost look like clouds, in ascending order on a black fabric background. |
I began the process of cleansing my lashes with the cleanser and it was very gentle.
 |
| Image description: Close up of Lara's Face, a pale skinned person, head slightly turned, wiping a cotton pad across her eye. |
I applied the adhesive to my chosen lift pad.
 |
| Image description: Close up of Lara's thumb holding a lift pad with lash adhesive on it. |
I stuck the lift pad on my eyelid and it didn't stick. I will elaborate on lessons learned in the thoughts section below.
 |
| Image description: Close up of Lara's face. She has applied a lift pad to her left eye and it is coming unstuck at the edges. |
I tried to stick both pads on, but things got very troublesome very quickly and I had to apply more adhesive, then they fell off, then I couldn't see, then I felt defeated.
 |
| Image description: Close up of Lara's face. She has applied lift pads to both eyes and they are too big for her. |
I was getting frustrated and I decided to cleanse my eyelids and try again, but with no luck. At this stage, I had rubbed my eyes raw and I gave up for the day because nothing was sticking down.
 |
| Image description: Close up of Lara's face. She is looking directly into the camera with a disgruntled look on her face. |
A FEW DAYS LATER...
I came back after I finally let my eyes calm down and I chose the Small lift pad. I went through the process of cleansing my eyelids and I down the lift pads to both eyes. It was finally a success!
 |
| Image description: Close up of Lara's right eye after applying a smaller sized lift pad. It is stuck on. |
I applied the adhesive to my lashes and using the flat end of the Y shaped cleaning tool, I swept up my lashes onto the lift pad.
 |
| Image description: Close up of Lara's right eye after gluing her lashes to the lift pad. |
I managed to successfully do it for both eyes after a grueling 20 or so minutes. (This whole procedure is supposed to take 30 minutes...)
 |
| Image description: Close up of Lara's face after applying lift pads and gluing lashes to them on both eyes. She is looking directly at the camera, smiling and giving a thumbs up. |
I applied the perming lotion to my lashes and placed plastic wrap over them. It was very difficult to see what I was doing and it kept falling off. I found that my lashes and lift pads became unstuck in some places too. I left it on for 10 minutes.
 |
| Image description: Close up of Lara's face. She has plastic wrap over her lashes. |
I cleaned off the perm solution with the Y brush and a cotton tip, then applied the fixation lotion, and as you can see, the lashes became completely unstuck at this stage and I was worried it wasn't going to work out. I left it on for 10 minutes. I tried so hard not to blink. If this were done in a salon, the client would have their eyes closed during the entire treatment.
 |
| Image description: Close up of Lara's face. She has plastic wrap over her lashes. |
I managed to go through the process and I was uncertain if it worked. I used Y tool to remove the excess product, then went over with a cotton pad and the cleanser, followed by the nutrition lotion, and then I looked in the mirror to see my lashes lifted.
 |
| Image description: Close up of Lara. She is looking at the camera with a surprised smile. |
.
Results
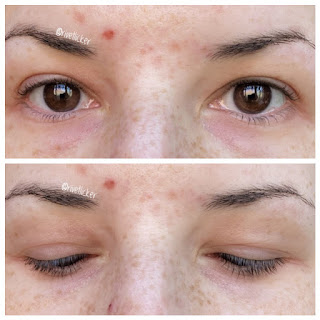
Let's start with my lashes before treatment. My lashes look meh from the front, but they are dense and sort of long.
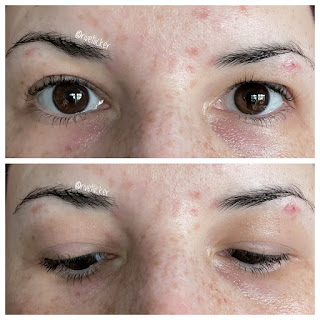
Immediately after treatment. I look like I have lashes when I open my eyes, but then they disappear when I close them, ha!
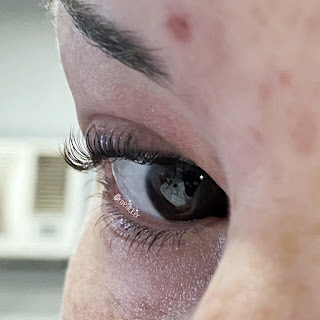
I took this close up immediately after treatment, it looks really cool.
 |
| Image description: Close up of Lara's right eye taken from the bridge of her nose. Her lashes are curled upwards and visible. |
Unfortunately, I made a lot of mistakes and my lashes curled too much and irritated my eyelids for about a week. The separation of my lashes was achieved by brushing them through with a spoolie. My lashes felt really crunchy for the first two weeks, and if I didn't keep them damp, they would curl inwards or end up messy, even doing a 180 downwards to poke inside my eyes. I wouldn't call this round a success. They only look good when they're wet.
3 weeks later, my lashes had softened a lot.
This whole time, I have been using the Peptide based UberLash Serum [Purchase] and Castor Oil based Wangkathaa Beauty Lash & Brow Serum [Purchase] to improve growth and soften my lashes, respectively, and they finally don't feel crunchy anymore or irritate me, but they still curl inwards. At the time of writing this, we are at around 6 weeks post treatment, shown in the image below.
 |
| Image description: Close up of Lara's left eye approximately 5 weeks after treatment. Her eye is open and her lashes are still lifted. |
.
I learned a lot during this process. I found there were numerous factors, both coming from user error and with the product itself.
1. I could have cut the lift pads to fit the size of my eyes and help them stick better. This information was not available in the instructions, and it should have been. It can be found in the FAQ section of the website, but when you're looking at the instructions while in the bathroom, you're probably not going to be looking at the website the whole time for tips on how to do it. These tips should be in the instructions.
2. I applied the perming lotion over the entirety of my lashes with a cotton tip, rather than at the base. This caused the lashes to become unstuck and take on an unwanted curl at the tips. Again, this information was not in the instructions, but in the FAQ section of the website. Having small eyes, a regular cotton tip was too large to achieve this accurately. I will use a pointed cotton tip to apply the product in future.
3. This treatment should be done one eye at a time, again, nothing on the instructions or website to advise this. This makes me believe this kit is not meant to be used at home on oneself to perform a lash lift, but for eyebrow lamination (given how similar products are sold). I will definitely do one eye a time, even if it takes twice as long.
Overall, do I think it is worth it? I'm not sure. I can't tell you until I do another treatment, which won't be until I grow back an entire new set of lashes, but when that time comes, I will be mindful about my application. From my first go, I wasn't totally impressed, but I definitely wasn't disappointed knowing the errors I encountered. I can definitely improve my application technique and get a better result. The product is guaranteed to last 6 months after opening, so I have at least another two lash lift applications from the $55AUD or so I spent on this. The cost of the kit is definitely less than one professional treatment, but the balance comes from the risk of user error being high - do you want to pay for a service from somebody who knows what they're doing, or do you want to risk doing it yourself and not getting the promised results; sometimes the professional option is the one that will save you money, especially if you feel defeated and don't want to do it again or find out you can't do it by yourself. Having said that, I have faith that this product does what it claims and can save you some money if you are confident using it. I have no concerns about the safety of this product either, and I believe that it is fully safe to use as directed for somebody who has both good visual acuity and a steady hand. I don't think it's accessible otherwise as I cannot perform the treatment on myself if I have a migraine aura (in my case, a professional treatment may be a better option for me). These thoughts only apply to the lash lift and not the eyebrow lamination, which I have yet to try at the time of publishing (keep your eyes on my Instagram for that!)
.
I hope you found this post informative and enjoyed reading it, I had fun doing it. Please leave any questions in the comments below.
Putting together blog posts such as these take a lot of time and effort on top of the cost of the product (if I have to purchase it myself), so I don't publish them often and leave this space for reviewing unique and unusual beauty products and trends. If you enjoy these posts, please consider buying me a coffee on Ko-Fi!
My regular beauty related content can be found on Instagram.
.
Have you ever a had a lash lift? Let me know!
This product was purchased by myself, my thoughts are honest. For more information, please read my Disclosure Policy.


This comment has been removed by a blog administrator.
ReplyDeleteThis comment has been removed by the author.
Delete